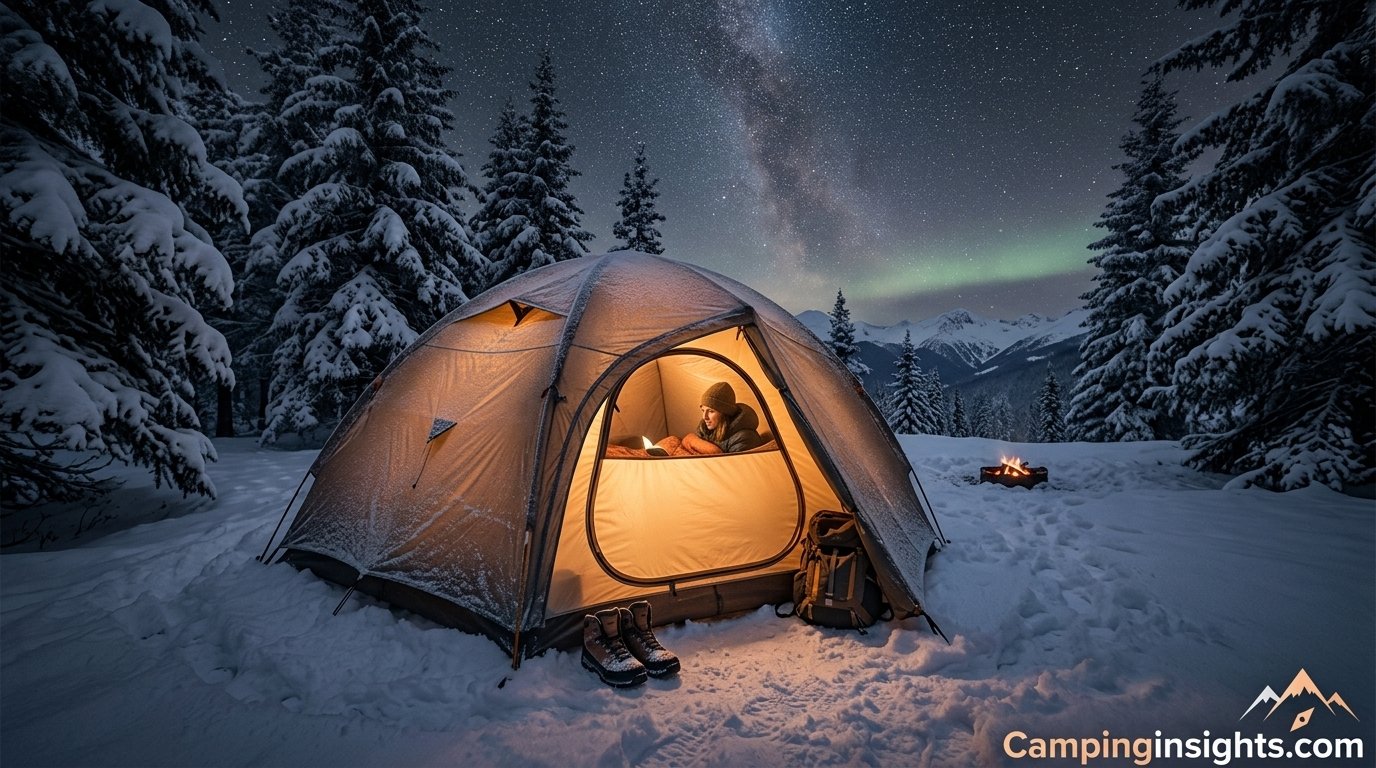
How to Keep Tent Warm at Night: A Complete Cold-Weather Camping Guide
Everything that actually works — from insulation and sleep systems to safe heaters and campsite placement — so you stop shivering and start sleeping through cold nights outdoors.
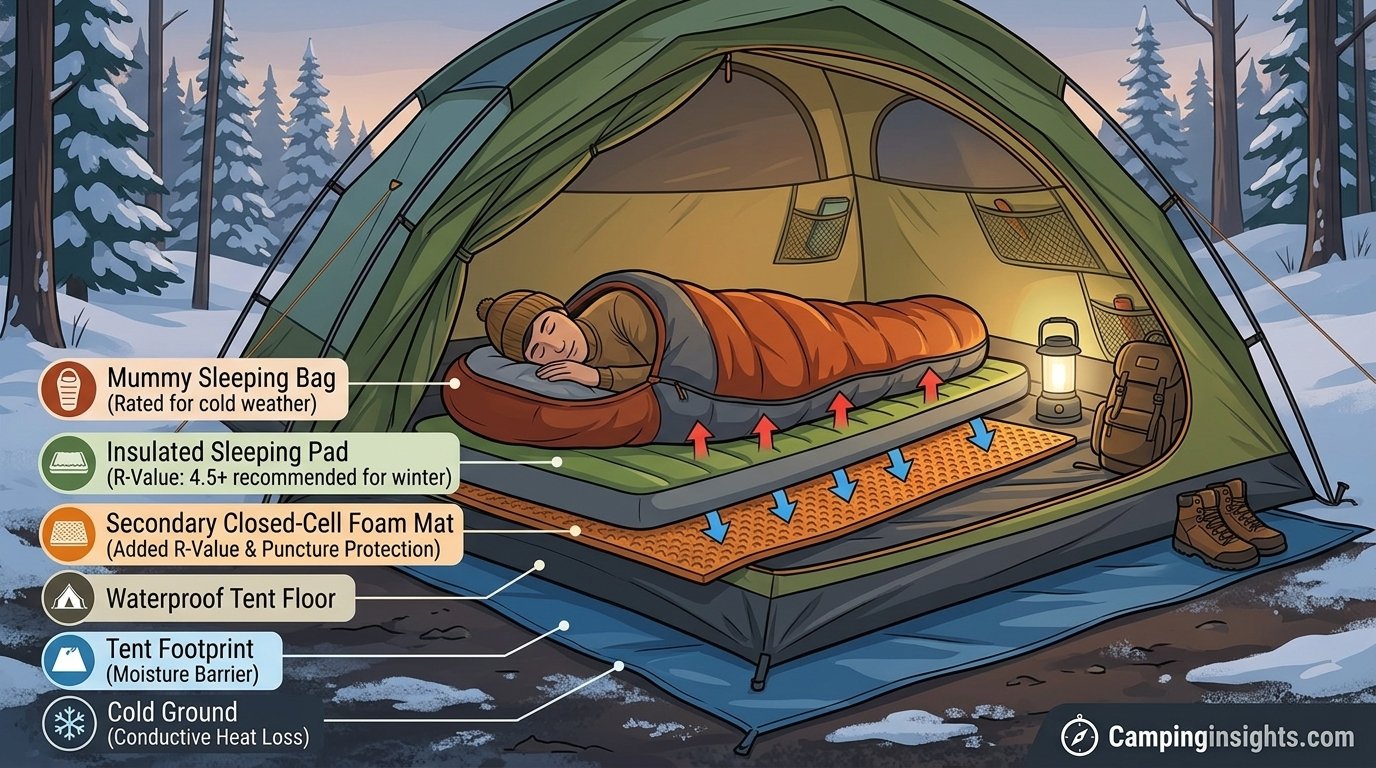
A warm night in a tent comes down to layers, not luck — ground insulation, sleep system, airflow, and setup all work together.
There’s a specific kind of misery that comes from lying awake at 2 a.m. in a tent, curled into a ball, socks on, jacket zipped to the chin, still cold. It’s not a lack of toughness — it’s usually a gap somewhere in your setup. Tents don’t generate warmth on their own. They only do one job well: block wind and hold in whatever heat you bring with you. Everything else, from the ground beneath your sleeping pad to the air you’re breathing all night, is working against you unless you actively manage it.
The good news is that a genuinely warm night in a tent is a solvable engineering problem, not a matter of luck or extreme gear. Most cold-night complaints trace back to two or three fixable issues: not enough insulation under the body, a sleep system rated for the wrong temperature, or a tent pitched somewhere that funnels cold air straight at the door. This guide walks through the full system, step by step, so you can diagnose what’s actually letting the cold in and fix it before your next trip.
Why Tents Get So Cold at Night
Before fixing the problem, it helps to understand exactly how a tent loses heat, because the fix depends entirely on which mechanism is dominant on a given night.
Conduction Through the Ground
The ground is almost always colder than the air above it, and it’s an incredibly efficient heat thief. When your body presses against a thin sleeping pad, heat transfers directly into the earth through conduction — physical contact between a warm object and a cold one. This is the single biggest reason people wake up cold, even in a warm-rated sleeping bag, because a sleeping bag traps air above you but does very little to stop heat loss underneath you where it’s compressed.
Convection From Moving Air
Even a small gap under the rainfly or a door zipper left cracked open lets cold air flow in and warm air flow out. Convection is why a 40°F night with wind can feel far colder inside a tent than a still 30°F night. Tents are not sealed boxes, and drafts around zippers, vents, and the base of the tent walls are constantly siphoning heat away.
Radiant Heat Loss
Your body radiates heat outward as infrared energy, and in a single-wall or poorly insulated tent, a large percentage of that heat simply radiates through the fabric into the cold night air, especially under a clear sky. This is the same reason frost forms on car windshields even on nights that aren’t the coldest of the season — clear skies pull radiant heat away faster.
Evaporative Cooling From Condensation
As you breathe and sweat overnight, moisture builds up inside the tent. When that moisture condenses on cold tent walls or damp gear, the evaporation and re-condensation cycle actively pulls additional heat from the air inside your shelter, compounding the cold.
How These Four Mechanisms Interact
None of these four pathways operate in isolation. A drafty tent (convection) loses warm, humid air fast, but that same airflow can actually reduce condensation (evaporative cooling), which is why a small amount of ventilation is a net positive even though it technically lets some heat escape. Meanwhile, a tent pitched on cold, damp ground amplifies both conduction and evaporation at once, since moisture wicking up through the floor gives the evaporative cooling cycle more material to work with. Understanding these interactions is what separates a setup that fixes one symptom from one that actually holds heat all night.
Once you see the problem as four separate heat-loss pathways — conduction, convection, radiation, and evaporation — the solution stops being “buy a warmer sleeping bag” and becomes “close each of these four leaks.” That’s exactly what the ten steps below are built to do. If you’re pitching in genuinely harsh conditions, it’s also worth reading our guide on how to keep a tent warm in winter for season-specific adjustments beyond what’s covered here.
Why “Just Buy a Warmer Bag” Isn’t the Full Answer
It’s a natural instinct to treat cold nights as a sleeping bag problem, and gear shops are happy to sell you increasingly expensive bags rated for increasingly extreme temperatures. But a sleeping bag only addresses one of the four heat-loss pathways — mostly radiation and some convection around your body — while doing almost nothing about conduction into the ground beneath you. Spend money on a $400 zero-degree bag and pair it with a thin $20 foam pad, and you’ll still wake up cold, because the bag was never the weak link in the first place. This is why the order of the steps below matters: ground insulation comes first, before sleep-system upgrades, because it fixes the biggest and most commonly ignored leak.
How Cold Is “Too Cold” for a Tent?
There’s no universal cutoff, because it depends entirely on how well the four heat-loss pathways are managed. A well-insulated, well-ventilated, properly sited tent with a correctly rated sleep system can be comfortable well below freezing. The same tent with a thin pad, a sealed interior, and a sleeping bag rated ten degrees too warm can feel miserable at 50°F. Rather than asking “how cold can a tent handle,” it’s more useful to ask “which of the four heat-loss pathways am I not managing yet” — and that’s the diagnostic lens this entire guide is built around.
Choose the Right Tent for Cold-Weather Insulation
Warmth starts before you ever leave home, with the tent itself. Not all tents are built to hold heat, and pitching the wrong shelter in cold conditions puts you behind before you even unroll a sleeping bag.
Three-season tents are designed primarily to block rain and bugs while maximizing airflow, which means they typically use large mesh panels for ventilation. That mesh is fantastic on a humid summer night and a liability on a cold one, because it offers almost no resistance to wind or radiant heat loss. A four-season or “mountaineering” tent, by contrast, uses more solid fabric panels, a lower profile to shed wind, and a fly that extends closer to the ground, all of which trap significantly more warmth.
If you’re only camping in cold-but-mild conditions — think autumn evenings or high-altitude summer nights rather than sub-freezing winter trips — you don’t necessarily need to buy a dedicated four-season shelter. Instead, look for a three-season tent with a full-coverage rainfly that reaches near the ground, minimal mesh on the lower half of the walls, and a compact dome or tunnel shape rather than a tall, airy cabin design. Tall vertical walls and large windows look great in photos but shed heat fast.
Tent Size Matters More Than People Expect
A cavernous tent feels comfortable, but more air volume means more space for your body heat to warm up, and that heat dissipates faster in a larger enclosed area. For cold nights, sizing your tent closer to the number of occupants — rather than going up a size “for comfort” — measurably improves how quickly the interior warms and how well it holds that warmth. If you’re shopping for a shelter built specifically with insulation in mind, our roundup of the best camping tents breaks down which models perform best in colder conditions.
Pay Attention to Fabric Denier and Fly Coverage
Beyond the three-season versus four-season distinction, look closely at the specifications of any tent you’re considering for cold trips. A higher denier (thickness rating) fabric on the fly and floor resists wind-driven cold and wear better than ultralight fabrics designed purely to save pack weight. Also check how far the rainfly extends down the tent’s sides — a fly that stops well above the ground leaves a gap where cold air and wind-blown snow or rain can sneak in, undermining even a well-insulated tent body underneath.
Vestibules Add a Useful Buffer Zone
A tent with a vestibule — the covered but unenclosed area just outside the main door — gives you a place to store cold, wet gear like boots and packs without bringing them into the sleeping compartment, and it also acts as a small airlock that softens the temperature swing every time you open the inner door. Tents without a vestibule dump cold outside air directly into the sleeping area every time you come and go.
Pole Structure Affects Wind Stability
Geodesic and semi-geodesic designs, which use crossing pole intersections to create a rigid, dome-like structure, hold their shape far better in wind than simple A-frame or single-hoop designs. A tent that flexes and shudders with every gust isn’t just uncomfortable to sleep in — it’s also losing warm air with every flex, since the moving fabric constantly disturbs the insulating air layer between the inner tent and rainfly. If you regularly camp somewhere windy, prioritizing pole structure alongside insulation ratings when comparing tents pays off directly in overnight warmth.

Look for a Double-Wall, Low-Profile Design
A separate rainfly with a full skirt and a dome or tunnel shape sheds wind and traps warm air far better than a single-wall summer tent.
Check Prices on AmazonInsulate the Tent Floor First
If you fix only one thing from this guide, make it this one. Ground insulation is the single highest-leverage change you can make, because conductive heat loss into the earth is relentless and constant, all night long, regardless of how good your sleeping bag is.
Understand R-Value
Sleeping pads are rated with an R-value, a measure of resistance to heat flow — higher numbers mean better insulation. For mild three-season camping, an R-value around 2 to 3 is usually enough. For near-freezing nights, aim for R-4 to R-5. For genuine winter camping on snow, look for R-6 or higher, or stack two pads to combine their ratings. A closed-cell foam pad (roughly R-2) placed underneath an inflatable pad is a classic combination: the foam pad blocks moisture and punctures, while the inflatable pad adds loft and comfort, and the two R-values add together.
Add a Footprint or Groundsheet
A footprint under the tent floor adds a thin buffer layer and protects the tent floor from moisture wicking up from the ground, which otherwise degrades your insulation over the night. In snow or frozen ground, a reflective emergency blanket placed shiny-side-up beneath your pad, under the sleeping area, can bounce a surprising amount of radiant heat back toward your body — a lightweight trick worth carrying for genuinely cold trips.
Don’t Skip Insulating the Whole Footprint, Not Just Where You Sleep
Cold radiating up from an uninsulated section of tent floor cools the entire air pocket inside the tent, not just the spot directly above it. If you have extra foam tiles or even a section of cardboard in a pinch, lining the full tent floor — not only the sleeping area — measurably slows how fast the whole interior cools once the sun goes down.
Watch Out for Compressed Insulation Under Your Weight
Any insulating layer — pad, blanket, or sleeping bag bottom — only works by trapping still air, and your body weight compresses whatever is directly underneath you far more than the material at your sides. This is why side sleepers in particular often report cold hips and shoulders even with a decent pad: those pressure points compress the pad’s loft the most. A slightly thicker or self-inflating pad, rather than a thin foam-only pad, holds more of its insulating loft under concentrated body weight.
Consider a Double-Pad System for Deep Cold
For genuinely cold trips — well below freezing, or camping directly on snow — a single pad rarely provides enough combined R-value on its own. Stacking a closed-cell foam pad underneath an inflatable pad, as shown in the diagram above, is the standard cold-weather solution used by mountaineers and winter backpackers, because it combines the puncture resistance and guaranteed insulation of foam with the comfort and higher R-value of an inflatable pad, and the two ratings add together in a straightforward way.
Quick tip: Test your pad setup at home before a cold trip. Lie on it on a cold garage or tile floor for twenty minutes — if your back feels the chill, your R-value isn’t high enough for the temperatures you’re planning to camp in.

Upgrade to a Winter-Rated Sleeping Pad
An R-5 or higher pad solves most cold-night complaints on its own — it’s the highest-impact single upgrade in this entire guide.
Shop Winter Sleeping PadsFor deep-winter trips on snow, pairing your pad choice with a dedicated cold-weather sleeping setup is worth planning in advance — our guide to the best sleeping pad for winter camping compares R-values and packability across the top options. If you’d rather sleep off the ground entirely, a well-insulated cot changes the equation too; see our picks for the best camping cot for side sleepers for models that pair well with an underquilt.
Layer Your Sleeping System Correctly
A sleeping bag’s temperature rating tells you the point at which an average sleeper stays alive, not the point at which they stay comfortable. Most manufacturers also publish a separate “comfort rating,” which is a far more honest number for planning a warm night. As a rule of thumb, choose a bag rated at least ten to fifteen degrees colder than the lowest temperature you expect, especially if you tend to sleep cold.
Use a Sleeping Bag Liner
A liner adds anywhere from five to twenty-five degrees of extra warmth depending on the material — silk liners add a modest boost with almost no bulk, while fleece liners add substantial warmth at the cost of extra pack weight. Liners also keep the inside of your bag cleaner, which matters on multi-night trips where washing isn’t an option.
Add a Blanket or Quilt on Top
Counterintuitively, a loose blanket or camp quilt draped over your sleeping bag — not tucked in tightly — traps an additional layer of warm air above you without compressing the bag’s own insulation. Compression is the enemy of insulation, since insulating materials work by trapping still air, and squashing them (whether by lying on them or wrapping them too tightly) destroys that trapped-air layer.
Warm Up Before You Zip In
Sleeping bags are excellent at maintaining heat but mediocre at generating it. Climbing into a cold bag with a cold body means you’ll spend the first hour shivering while your body slowly warms the dead air space. Doing ten minutes of light exercise — jumping jacks, a short walk, or even just stretching — right before bed raises your core temperature so the bag has a head start. Avoid working up a heavy sweat right before bed, though, since damp skin undoes much of the benefit; the goal is raising your core temperature slightly, not a full workout.
Eat a Small Snack Before Sleep
Digestion generates metabolic heat, which is part of why a light snack before bed — something with a bit of fat or protein, not just sugar — can genuinely help maintain body temperature through the first few hours of sleep, when your metabolism naturally starts to slow down for the night.
Check the Bag’s Fit, Not Just Its Rating
A sleeping bag that’s too large for your body has to warm extra empty air space before it feels warm around you, while a bag that’s genuinely too tight compresses insulation at the shoulders and feet. Mummy-style bags that taper closer to the body’s shape are noticeably more thermally efficient than roomy rectangular bags for cold-weather use, precisely because there’s less unused air volume for your body to heat.
Down Insulation
- Best warmth-to-weight ratio
- Compresses small for packing
- Lasts many seasons if cared for
Synthetic Insulation
- Insulates even when damp
- Cheaper up front
- Dries much faster if wet
Use a Safe Tent Heater or Heat Source
Safety first: Never run a combustion heater — propane, butane, or wood — inside a fully sealed tent. Carbon monoxide is odorless, invisible, and fatal, and tents are not ventilated enough to safely vent combustion byproducts without a battery-powered CO detector and a cracked vent at minimum. Only use heaters explicitly rated as “indoor safe” with automatic low-oxygen shutoff, and always maintain ventilation.
With that safety baseline in place, there are several genuinely effective ways to add active heat to a tent rather than only relying on trapped body heat.
Battery-Powered and Electric Heaters
Small 12V or battery-bank-powered heaters are the safest active heat source for tent camping, since they produce no combustion byproducts. They won’t heat a large tent to room temperature, but running one for thirty to sixty minutes before bed — then switching it off — takes the edge off the initial cold shock without needing to run it all night.
Chemical Hand and Body Warmers
Disposable or reusable heat packs placed near your core, feet, or inside a jacket pocket at the foot of your sleeping bag provide hours of steady, safe warmth with zero fire risk. They’re inexpensive, weigh almost nothing, and are one of the most reliable low-effort warmth additions for any cold trip. Pack a few extra pairs beyond what you think you’ll need — they’re light enough that the added weight is negligible, and having a backup pair for an unexpectedly cold night is worth far more than the few extra grams in your pack.
Heated Tent Rugs and Floor Mats
For car camping or short-hike-in trips where weight isn’t a major concern, a battery or power-station-fed heated mat placed under your sleeping area adds consistent, gentle warmth from below — directly counteracting the conductive heat loss discussed in Step 2.
Wood Stoves for Hot-Tent Camping
A dedicated hot-tent setup — a canvas tent with a fireproof stove jack and a small wood-burning stove — is a completely different category from a standard backpacking tent heated with a portable device, and it’s genuinely capable of keeping a tent warm for an entire winter night. This approach requires specific gear built for the purpose (a stove-jack-compatible canvas tent and a properly vented small stove) and isn’t something to improvise with a standard nylon backpacking tent, which simply isn’t fire-rated. For most weekend campers, the battery and chemical options above cover the need far more simply.

A Battery Heater Takes the Edge Off Fast
Run it for the first hour to warm the air pocket inside the tent, then switch to passive insulation for the rest of the night.
See Portable Heater OptionsTrap Body Heat with Smart Tent Setup
Your body is already producing a steady amount of heat every night — the trick is stopping that heat from escaping instead of trying to generate more of it. A resting adult generates a meaningful, steady amount of heat purely from basal metabolism, more than enough to noticeably warm a small, well-sealed tent interior over the course of a few hours. A few setup choices make an outsized difference in how much of that heat actually stays trapped around you rather than escaping into the surrounding air.
Downsize Your Sleeping Space
If you’re camping solo in a two- or three-person tent, consider pitching an inner tent or using a bivy-style liner to shrink the actual air volume around your body. Less air to heat means the space you’re actually occupying warms up faster and holds that warmth longer.
Insulate the Ceiling and Walls Where Possible
Draping a lightweight tarp or emergency blanket across the interior ceiling of the tent (leaving ventilation gaps, never sealing it airtight) adds a radiant barrier that reflects your body heat back down instead of letting it escape straight through single-layer tent fabric.
Close Off Unused Vestibule and Door Space
Vestibules are great for gear storage but act as a cold buffer zone that pulls heat out of the main sleeping compartment if left wide open. Zip the inner tent door fully closed, and if your model has an adjustable vestibule opening, keep it as small as ventilation requirements allow.
Huddle Strategically in Group Tents
If you’re camping with others, sleeping closer together (even in separate bags, side by side rather than spread across the tent) meaningfully raises the shared air temperature around the group. Body heat compounds — three people generate roughly three times the passive warmth of one, in a space that isn’t three times larger.
Store Cold Gear Outside the Sleeping Compartment
Boots, water bottles, and packs that have been sitting in cold air all day are, effectively, cold-storage blocks. Bringing them into the main sleeping compartment forces the warm air you’ve worked to trap to spend energy warming those objects instead of you. Keep bulk gear in the vestibule where possible, and only bring inside what you genuinely need close at hand, like a headlamp or the next day’s base layer you want to pre-warm.
Manage Condensation and Ventilation
It feels backward to talk about ventilation in a guide about staying warm, but skipping this step is one of the most common mistakes that makes a tent colder and damper by morning.
Why Sealing a Tent Completely Backfires
Every breath you exhale releases warm, moist air. In a fully sealed tent, that moisture has nowhere to go, so it condenses on the cold inner walls of the fly. Once your sleeping bag, clothing, or gear touches that condensation, the evaporative cooling effect described earlier kicks in and actively pulls heat from the air — making the tent feel colder than an equivalent tent with modest airflow. A two-person tent with the vents fully closed can accumulate a surprising amount of moisture over eight hours of overnight breathing, enough to visibly soak the lower few inches of the tent wall by morning.
Crack Vents Even on Cold Nights
Most three- and four-season tents have adjustable vents specifically designed to let humid air escape without creating a direct wind draft. Leaving even one vent slightly open dramatically reduces interior condensation, which keeps your gear dry and your sleeping bag’s insulation performing at full capacity — a wet-out bag loses insulating power fast.
Avoid Cooking or Boiling Water Inside the Tent
Beyond the serious carbon monoxide risk already covered in Step 4, cooking inside the tent releases a large amount of additional moisture into the air, worsening condensation right when you need the interior to stay as dry as possible.
If condensation has been a recurring problem on past trips, our dedicated guide on how to stop condensation in a tent goes deeper into vent placement, fabric choice, and drying strategies than we have room for here.
Wipe Down Interior Walls Before Bed
If condensation has already started forming on the tent’s interior walls from an earlier point in the trip, wiping it down with a dedicated camp towel before settling in for the night prevents that moisture from dripping onto your sleeping bag later, and stops the evaporative cooling cycle before it starts working against you overnight.
Dress in the Right Layers for Sleep
What you wear to bed matters almost as much as the bag you’re sleeping in, and a surprising number of campers get this wrong in one of two opposite directions.
Avoid Overdressing
Piling on every layer you own before bed feels intuitive, but bulky clothing compresses the loft of your sleeping bag from the inside, reducing its insulating air pocket. It can also trap sweat against your skin, which then cools and chills you later in the night. The goal is a dry, breathable base layer — not a snowsuit.
The Ideal Sleep Layering System
- Base layer: A moisture-wicking merino wool or synthetic thermal top and bottom, never cotton, which holds moisture against skin and accelerates heat loss.
- Dry socks: Change into a fresh, dry pair specifically for sleeping — feet sweat throughout the day, and damp socks are one of the fastest ways to get cold feet overnight.
- Insulated hat or beanie: A significant share of body heat escapes through the head and neck; a snug beanie makes a noticeable difference.
- Neck gaiter or buff: Seals the collar gap where warm air otherwise leaks out of a zipped sleeping bag.
Change Out of Daytime Clothes Entirely
Even clothing that feels dry after a day of hiking usually holds trace moisture and body oils that reduce its insulating performance overnight. A dedicated set of sleep-only clothes, kept in a dry stuff sack during the day, guarantees you’re climbing into your bag with truly dry insulation against your skin.
Keep Tomorrow’s Clothes Warm Too
Stashing the next day’s base layer inside the foot of your sleeping bag overnight does double duty: it keeps that clothing from freezing solid in cold conditions, and it gives you a warm, dry layer to change into first thing in the morning instead of shocking yourself awake with frozen clothing before the sun is even fully up.
Use Hot Water Bottles and Heat Packs Safely
This is one of the oldest tricks in outdoor sleeping, and it still works better than most modern gadgets: a durable water bottle filled with hot (not boiling) water, sealed tightly, and placed inside your sleeping bag.
Where to Place It
Position the bottle near your core or between your thighs first, where major blood vessels run close to the skin — this warms your circulating blood efficiently and spreads warmth throughout the body faster than placing it at your feet alone. Once your core is warm, you can reposition it near cold feet for the rest of the night.
Safety note: Use only bottles rated for hot liquids (most hard-sided outdoor bottles, not thin disposable plastic), never fully boiling water, and always wrap the bottle in a sock or thin layer of fabric to prevent direct skin contact and low-grade burns during sleep.
Reusable Heat Packs as an Alternative
Gel-based reusable heat packs that you activate by boiling or snapping work similarly to a hot water bottle, with the advantage of holding a stable temperature for longer and being reusable trip after trip without needing a dedicated water-safe bottle.
Time It With Your Evening Routine
Boiling water for a hot water bottle right as you’re finishing dinner or evening chores means the bottle is ready exactly when you’re ready for bed, rather than sitting around losing heat while you finish packing up camp. A wide-mouth bottle also doubles as usable warm water for the next morning’s coffee if you don’t fully drain the heat out of it overnight.
Block Wind and Drafts Around the Tent
Wind chill applies to tents just as it does to exposed skin. A tent that would keep you perfectly warm on a still night can feel dramatically colder when wind is constantly stripping heat away from the fabric surface through convection. In practice, this means two campers on the exact same night, with identical gear, can have completely different experiences depending purely on whether one pitched in a sheltered hollow and the other pitched on an exposed ridge.
Use Natural Windbreaks
Pitch behind a tree line, boulder formation, or rise in terrain whenever possible, positioning the tent so the lowest, most reinforced end faces into the prevailing wind direction rather than the door. Avoid open ridgelines and exposed clearings, which might look appealing for the view but expose your shelter to the full force of overnight wind.
Stake Out the Rainfly Completely
A loose or partially staked rainfly flaps in wind, which pulls warm air out from between the fly and the tent body — an insulating air gap that only works when it’s stable. Use every guy line point your tent has, angled at roughly 45 degrees from the tent body, and choose stakes rated for the ground conditions you’re camping on.
On rocky or frozen ground where standard stakes struggle to bite, upgrading your stake kit prevents the whole windbreak strategy from failing at 3 a.m. when a gust pulls a corner loose. Our guide to the best tent stakes for rocky ground covers which designs actually hold in difficult terrain.
Build a Snow or Rock Wall
In genuinely exposed winter conditions, packing a low snow wall or stacking rocks on the windward side of the tent creates an artificial windbreak where nature doesn’t provide one. Even a knee-high wall meaningfully cuts wind speed at ground level, right where it matters most for a tent’s lower walls.
Angle the Tent’s Narrow End Into the Wind
Most dome and tunnel tents are more aerodynamic end-on than broadside, similar to how a car is more efficient facing into headwind than sideways to it. Orienting the tent’s lowest, most tapered end toward the prevailing wind reduces the surface area directly fighting the wind and cuts down on the fabric flex that pulls heat out through convection.
| Windbreak Option | Effort Level | Best For |
|---|---|---|
| Natural tree line / boulders | None — just site selection | Forested or rocky campsites |
| Full guy-line staking | Low — a few extra minutes | Every trip, every tent |
| Packed snow wall | Moderate — 15–30 min | Exposed winter or alpine sites |
| Vehicle as windblock | None if car camping | Car camping in open lots |
Choose the Best Campsite Location for Warmth
Where you pitch your tent has a bigger impact on overnight temperature than most campers realize, and it costs nothing to get right — it just takes a few extra minutes of scouting before you commit to a spot. Of everything covered in this guide, campsite selection is the one factor with genuinely zero downside: it doesn’t add pack weight, doesn’t cost money, and doesn’t require any extra gear, only a little patience before setting up camp for the night.
Avoid Low Valleys and Depressions
Cold air is denser than warm air and sinks into low-lying terrain overnight, a phenomenon called cold air drainage. A campsite in a valley bottom or depression can be noticeably colder than a site just a short distance up a gentle slope, even though both are exposed to the same regional weather.
Look for Tree Cover Overhead
A forest canopy above your campsite reduces radiant heat loss to the clear night sky, in the same way cloud cover keeps overnight temperatures milder than a clear sky does. Pitching under moderate tree cover — while still avoiding dead branches overhead — can measurably reduce how cold the tent gets compared to an open, sky-exposed clearing.
Face the Door Away From Prevailing Wind
Check wind direction before staking out your tent, and orient the entrance so it faces downwind or is shielded by the tent’s own low, aerodynamic profile. Every time the door opens facing directly into the wind, you lose a burst of accumulated warm air.
Pick Dry, Well-Drained Ground
Damp ground conducts heat away from your tent floor faster than dry ground, compounding the conductive losses covered in Step 2. Slightly elevated, well-drained spots — away from streambeds and obvious moisture — stay both warmer and drier through the night. If a wet forecast is part of the challenge, our tips for camping in the rain pair well with this section for shoulder-season trips where cold and wet often show up together.
Scout in Daylight, Not After Dark
All of the site-selection factors above — cold air drainage, tree cover, wind direction, ground drainage — are far easier to judge with a few extra minutes of daylight than by headlamp after a long day of hiking. Arriving at camp with enough daylight left to actually walk the immediate area and compare two or three potential spots pays off directly in how warm the night turns out to be.
Common Mistakes That Make Your Tent Colder
Even experienced campers repeat a handful of habits that quietly undo all the effort put into the steps above. Watching for these is often the difference between a genuinely warm night and a frustrating one.
- Skipping ground insulation to save weight. A thin pad is the single most common cause of a cold night, even when everything else is done right.
- Sealing the tent completely airtight. This traps condensation, which then actively cools the interior air through evaporation.
- Sleeping in the same clothes worn all day. Trace sweat and moisture in daytime layers reduce their insulating value overnight.
- Going to bed already cold. Climbing into a bag without warming up first means the bag spends hours catching up instead of maintaining warmth.
- Ignoring campsite placement. Pitching in a valley bottom or fully exposed clearing undoes hours of gear preparation.
- Leaving the rainfly loosely staked. A flapping fly pulls warm air out of the insulating gap between fly and tent body.
- Running an unrated combustion heater inside a sealed tent. This is a serious carbon monoxide risk, not just an inefficiency.
- Overfilling the tent with cold gear. Boots, packs, and cold water bottles stored inside the sleeping compartment slowly pull ambient heat from the air around them.
Most of these mistakes share a common thread: they’re all habits carried over from warm-weather camping, where airflow, minimal layering, and a spacious tent are genuine advantages. Cold-weather camping asks for close to the opposite approach in several places, which is exactly why campers with plenty of summer camping experience are sometimes caught off guard the first time temperatures drop well below what they’re used to. Reviewing this list before a cold trip — even a quick mental run-through while packing — catches most of these issues before they turn into a sleepless night.
Comparison: Best Ways to Heat a Tent at a Glance
Not every method suits every trip. This table lines up the main approaches from this guide by cost, effort, and how much warmth they realistically add, so you can prioritize based on your own conditions. If you’re working with a limited budget or pack weight, prioritize the “Free” and low-cost, low-effort options first — campsite selection and full guy-line staking cost nothing and take only a few extra minutes, yet they consistently show up as the difference between a cold night and a comfortable one in camper feedback across cold-weather trip reports.
| Method | Warmth Added | Cost | Effort | Best For |
|---|---|---|---|---|
| Insulated sleeping pad (R-5+) | High | $$ | None once packed | Every cold-weather trip |
| Battery-powered heater | Medium–High | $$ | Low | Car camping, short bursts |
| Hot water bottle | Medium | $ | Low | Backpacking, any trip |
| Sleeping bag liner | Medium | $ | None once packed | Boosting an existing bag |
| Campsite selection | Medium | Free | Low (planning only) | Every trip, zero downside |
| Windbreak / full staking | Medium | Free | Low | Exposed or windy sites |
| Chemical heat packs | Low–Medium | $ | None | Cold feet, backup warmth |
| Tent ceiling radiant barrier | Low–Medium | $ | Low | Single-wall or budget tents |
If you’re outfitting a full winter kit from scratch, it’s also worth having a basic repair kit on hand — cold, brittle fabric and zippers are more prone to failure in freezing conditions than in mild weather. See our recommendations for a best tent repair kit to keep in your pack as cheap insurance.
Frequently Asked Questions
What’s the single best way to keep a tent warm at night?
Ground insulation almost always delivers the biggest single improvement. A high R-value sleeping pad, layered with a closed-cell foam pad underneath, addresses the largest source of heat loss — conduction into the ground — before anything else even comes into play. Most campers who upgrade only their pad, without changing anything else about their setup, report a noticeably warmer night on the very next trip.
Is it safe to use a propane heater inside a tent overnight?
Only if it’s specifically rated as indoor-safe with an automatic low-oxygen shutoff, and even then, ventilation and a battery-powered carbon monoxide detector are essential. Many campers avoid combustion heaters entirely in favor of battery-powered electric heaters or hot water bottles, which carry no carbon monoxide risk.
How many degrees warmer does a sleeping bag liner actually make a bag?
It depends on material: silk liners typically add around five to ten degrees Fahrenheit of extra warmth, while fleece liners can add fifteen to twenty-five degrees, though at a noticeable increase in bulk and weight.
Why does my tent feel cold even with a warm-rated sleeping bag?
This is almost always a ground insulation problem. Sleeping bag ratings assume a reasonably insulated pad underneath; a thin or worn-out pad lets conductive heat loss overwhelm even a genuinely warm bag.
Should I sleep with wet clothes in my sleeping bag to dry them?
This isn’t recommended for warmth. Damp clothing inside your bag increases evaporative cooling right next to your body. If you need to dry gear overnight, keep it in a dry stuff sack near your feet rather than directly against your skin.
Does tent color or material affect how warm it stays?
Darker fabrics absorb slightly more solar heat during the day, which can help a tent start the evening warmer, but this effect is minor compared to insulation, ventilation, and campsite placement once the sun goes down.
How much colder is it inside a tent compared to outside temperature?
A well-set-up tent with good ventilation control and a warm sleeper inside can run ten to twenty degrees warmer than the outside air. A poorly insulated or badly ventilated tent may offer very little advantage over open air at all.
Is a double-wall or single-wall tent better for cold weather?
Double-wall tents generally perform better in cold conditions because the air gap between the inner tent and rainfly adds a layer of insulation and helps manage condensation, keeping the inner tent drier than a single-wall design. Single-wall tents can still work well in cold, dry climates with low humidity, but they tend to struggle more in damp or highly variable conditions where condensation builds up quickly on a single layer of fabric.
Can I use a space heater made for indoor home use in a tent?
No. Standard household space heaters aren’t designed for the ventilation conditions, fire risk, or power draw involved in tent camping, and many aren’t rated for the kind of enclosed, fabric-walled space a tent creates. Stick to heaters specifically marketed as portable, outdoor, or camping-rated.
Why do my feet stay cold even when the rest of my body is warm?
Feet have relatively poor circulation compared to the torso, and they’re often the last area to warm up. Dry sleeping socks, a hot water bottle positioned at the foot of the bag once your core is warm, and avoiding tight socks that restrict circulation all help.
Does pitching the tent early in the day help it stay warmer at night?
Yes, to a degree. A tent that’s had time to warm slightly in afternoon sun, combined with a fully staked, taut setup completed well before dark, holds heat more effectively than one rushed together in the cold and dark after sunset.
Cold-Night Camping Checklist
Before heading out on a trip where overnight temperatures are a real concern, run through this list. It pulls together the highest-impact items from every step above into a single pre-trip check.
- Insulated pad rated for your expected low temperature (stack a foam pad underneath if it’s a close call)
- Sleeping bag rated at least 10–15°F below the forecast low
- Dry base layer set reserved only for sleeping, packed separately from daytime clothing
- Beanie or insulated hood and a neck gaiter to seal heat leaks at the head and collar
- Full set of stakes and guy lines appropriate for the ground conditions
- A durable, hot-liquid-rated bottle if you’re planning to use the hot water bottle method
- A battery-powered or indoor-safe heater, if you’re bringing active heat, plus a battery-powered CO detector for any combustion source
- A basic tent repair kit in case cold-brittle fabric, zippers, or poles need a fast fix
- A plan for campsite selection — checked wind direction, elevation, and tree cover before committing to a spot
Conclusion: Building a Warm Night From the Ground Up
A genuinely warm night in a tent isn’t about one magic product — it’s about closing off the four ways heat escapes: conduction into the ground, convection through drafts and wind, radiation into open sky, and evaporation from condensation. Start with insulation under your body, layer a sleep system rated for colder than you expect, manage airflow instead of sealing the tent shut, and choose a campsite that isn’t working against you before you even unpack. Add safe, targeted heat sources like a battery heater or hot water bottle on the coldest nights, and the mistakes that ruin most cold-weather trips — thin pads, sealed tents, damp clothing, exposed campsites — become easy to avoid.
None of these steps require expert-level gear or experience, just a deliberate setup done once before you climb in for the night. Get the fundamentals from this guide right, and cold nights stop being something to dread and start being just another part of camping — one you’re actually equipped to handle, trip after trip, regardless of how far the temperature drops once the sun goes down.

Ready to Upgrade Your Cold-Weather Sleep System?
A high R-value pad paired with a properly rated sleeping bag solves the majority of cold-night complaints on its own.
Shop Cold-Weather Sleep Gear